How to Change Branch in Pnb One Mobile App / Internet Banking?

How to change the branch in Pnb One mobile app
- Changing the branch in the PNB One mobile app is a convenient feature that allows customers to transfer their banking operations from one branch to another without visiting a physical location. Whether you're relocating or simply prefer a different branch, the app provides a seamless process to update your branch details. This guide will walk you through the steps to change your branch within the PNB One app, ensuring your account and services are smoothly transitioned. With just a few taps, you can manage your banking preferences with ease and continue to enjoy the benefits of PNB's digital services.
We can provide you with the Useful steps that are typically followed to change the branch in mobile banking apps. Here's a step-by-step guide that should give you an idea of the process:
- Open the App: Launch the PNB One mobile app on your smartphone. You will be prompted to enter your login credentials to access your account.
- Login: Enter your username and password to log in to your account.
- Access Account Settings: Once you are logged in, look for the settings icon. It is usually represented by a gear or three vertical dots arranged vertically. Click on this icon to access the settings menu.
- Choose Branch Settings: Within the settings menu, there should be an option for managing your branch preferences or settings. Click on this option to proceed.
- Select Change Branch: Look for the option to change your branch. This might be under a sub-menu or within the branch settings page itself. Click on the "Change Branch" option.
- Search for New Branch: You may be prompted to enter the name or location of the new branch you wish to switch to. Use the search function to find the desired branch from the list provided.
- Confirm the Change: After selecting the new branch, the app might ask you to confirm your choice. Confirm the branch change to initiate the process.
- Verify the Change: Some apps may require additional verification steps to ensure security. This could involve entering an OTP sent to your registered mobile number or an authentication code.
- Save Changes: After completing the necessary steps, make sure to save the changes. The app might display a confirmation message indicating that the branch has been successfully changed.
How to Change Branch in PNB Internet Banking:
- Changing your branch in PNB (Punjab National Bank) through Internet Banking can simplify your banking experience by allowing you to manage your accounts more efficiently. Whether you've relocated or need to access services from a different branch, PNB's online platform provides a convenient way to request this change without visiting the branch physically. This guide will walk you through the process, ensuring that you understand each step clearly. By following these instructions, you can seamlessly transition your account to a new branch, maintaining access to all your banking services.
The following steps should give you a general idea of the process:
- Log in to PNB Internet Banking: Visit the official PNB Internet Banking website and log in to your account using your user ID and password.
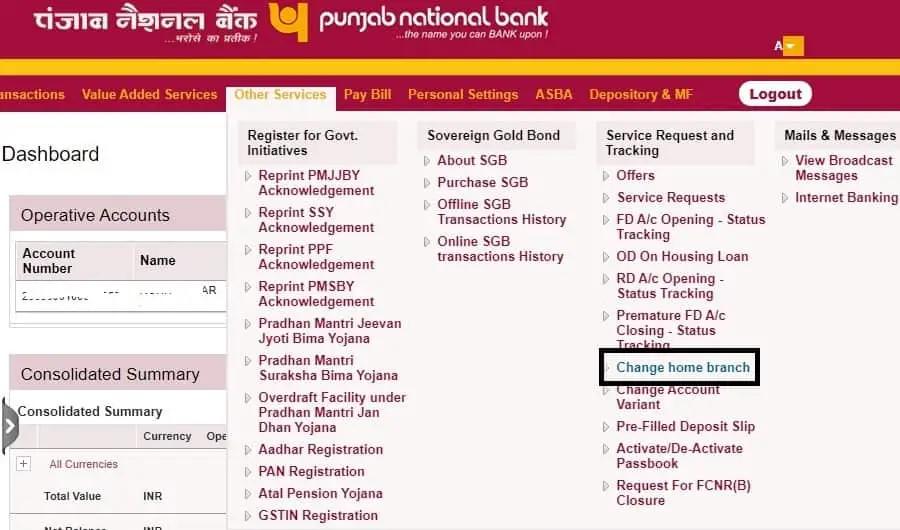
- Navigate to Account Settings: Look for an option that allows you to manage your account settings. This option may be labeled as "Account Settings" or something similar.
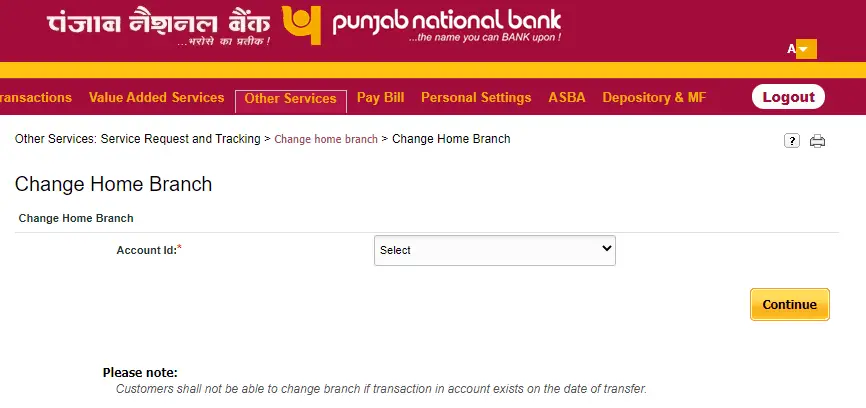
- Locate Branch Change Option: Within the account settings, there should be an option to change your branch. Click on this option to proceed.
- Select New Branch: You may be asked to search for or select the new branch you want to switch to. Use the provided search function to find the desired branch from the list.
- Confirm the Change: After selecting the new branch, the website might ask you to confirm your choice. Review the details and confirm the branch change to initiate the process.
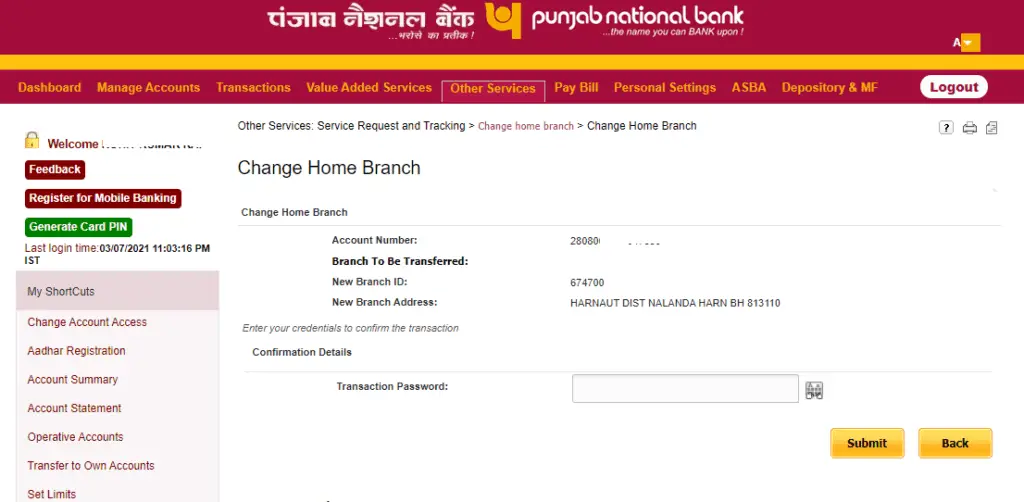
- Complete Verification: To ensure security, additional verification steps may be required. This could involve entering an OTP sent to your registered mobile number or an authentication code.
- Save Changes: After completing the necessary steps, make sure to save the changes. The website should display a confirmation message indicating that the branch has been successfully changed.
Note: Customers shall not be able to change branches if the transaction in the account exists on the date of transfer. Please don’t do any transactions on the day you have requested for account transfer. You can do transactions after 24 hours as usual.
We hope that you like this content and for more such content Please follow us on our social site and YouTube and subscribe to our website.
Manage your business cash flows and payable/receivables using our Bahi Khata App.


Comments ()